OSRS Hunter Guide

Table of Contents
- Useful Quests
- Useful Items
- Profitable Training Methods
- Fast Training Methods
Useful Quests
- The Ascent of Arceuus: 1,500 EXP
- Eagles' Peak: 2,500 EXP
- Monkey Madness II: 15,000 EXP
- Song of the Elves: 20,000 EXP
Useful Items
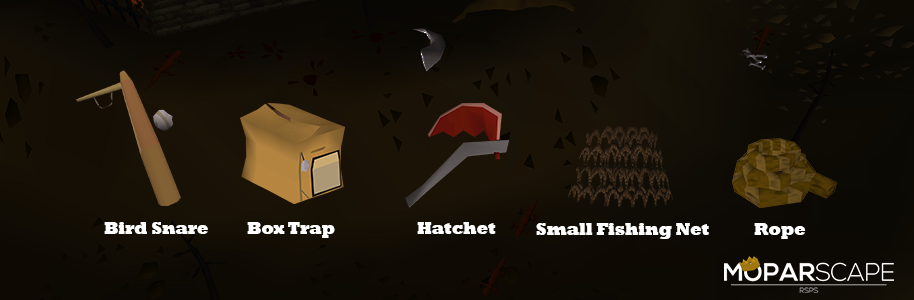
Bird Snare
This will catch birds as they land on the trap. You will likely only use this for low level training.
Box Trap
This item is used to trap chinchompas: from gray to black.
Butterfly Net
Used to catch butterflies or implings.
Woodcutting Axe
Needed to gather wood for deadfall traps.
Small Fishing Net
Not only is it used for fishing, but also creating traps to catch salamanders.
Rope
Used with fishing nets to make the salamander trap.
Hunter Potion
A potion that temporarily boosts your hunter level by three. It’s useful if you want to get started on a certain training method but you are short by a few levels.
Full Graceful Set
This is useful for hunter training methods that require lots of running around, like tracking Herbivores.
Profitable Training Methods
Tracking Common Kebbits (3 - 13/25+)
Since this method needs level three to start, you can train using another quick method or by doing the Varrock Museum mini-game beforehand. If not, you may always use a Hunter Potion to boost for the first few levels. The only thing you need is a noose wand, weight reducing equipment and possibly energy potions from all the running around.
You will find common kebbits towards the southern end of the Piscatoris Hunter area. You will need to inspect nearby objects, like rocks or plants, to continue to reveal their trail. While it’s kind of tedious, it’s easy to follow along the tracks until the very end where you can attack the hiding kebbit with your noose. Each kill gives a 36 experience drop, making it a slower but more enjoyable path to training the early levels of Hunter.
The fur of the Kebbit is the only thing you want to keep, discarding the rest. It is used as a part of the first tier of hunter clothing and trade for well over 1,000 coins each. Most other kebbits have cheap fur, so this is more of a profitable method over some other high-level ones. Investing in Rings of Pursuit, you have a chance of revealing the entire path, making this method much faster.
Tracking Desert Devils (13 - 25+)
This method has the same profit potential as common kebbits, albeit with much more experience per catch. You will get a 66 experience to drop each catch compared to the 36 experience with common kebbits. Their fur is used to create the Desert Camo set and is traded at around 1,000 coins or so on the market.
You will need to travel to the Uzer Hunter Area near the Ruins of Uzer, so be sure to bring desert robes and water skins. This area can simply be reached by traveling via the magic carpet system from the Shantay Pass, where you may also bank the furs. Some running will be involved, so you may utilized energy or stamina potions.
You track the desert devil from his initial burrow and then inspecting cacti, rocks and other objects until you reveal the trail. Once you find his hiding spot, you will kill him and collect his fur. Be sure to drop the raw beast meat and bones as they will only be taking up inventory space.
Bird House Traps (25 - 99)
The idea of birdhouses is a concept by the new OSRS development team in which players may passively trap birds while AFK or doing other activities. It functions similarly as farming and most players lump it together while doing herb or tree runs. In order to do them, you must have completed the Bone Voyage quest to access Fossil Island. It’s also recommended to have the minimum crafting level for each birdhouse so can craft them on the spot instead of buying them.
A birdhouse is made by using a log with a clockwork while having a chisel in your inventory. You need a hammer to put up the birdhouse and any type of hop seeds to use as bait. There is very little time needed to invest, but you will have to wait for them to fill up.
If you are an ironman or have trouble buying clockwork from the GE, it can be made on the Clockmaker’s Bench in your player-owned house. It takes 1 steel bar per clockwork, and it may be re-used infinitely for birdhouses.
Equally, finding bulk hop seeds can be problematic at times, especially for ironmen. There is a store in Draynor Village that sells a variety for next to nothing. Just hop worlds until you have your fill on seeds.
Begin every run by teleporting to the Digsite (not the island itself), and take the boat to Fossil Island. Run west to the first birdhouse to collect your birds and the re-create the birdhouse trap. Follow the road to the northern birdhouse to do the same. Then take the Mycelium Transport tree to the Verdent Valley and repeat the same for the two birdhouse spots there.
Aside from the experience drops, every bird caught has a random chance to give you a birdhouse. Within these birdhouses are sometimes tree seeds or rings. While one unlucky run may yield a few thousand gold in profit, you have the chance to get expensive seeds like Magic or Palm. The gold per hour is quite unpredictable, but many players have reported to end up with millions in profits after weeks of consistent runs.
While birdhouse training is possible to start at Level 5, the lower tiers of birdhouses catch so few birds that it is barely worth it. At Level 25, you may use Willow Bird Houses, allowing you to catch 4 at a time. The more birds you can catch, the more profit potential you may make per run.
For reference, a level 5 birdhouse with regular logs will only give 280 experience maximum. Meanwhile, a Redwood birdhouse will give 1,200 each. It will take just under an hour for each one to fill up with birds, so keep that in mind when planning daily experience rates.
Snaring White Rabbits (27 - 37)
This is often an overlooked training method because of how convoluted it is, but it can be quite profitable since rabbit feet usually trade for well over 1,000 gold each. The level requirement isn’t high, but the player needs to have Eagles’ Peak completed. Having access to the Fairy Ring teleport system is also recommended to make banking viable.
The idea of this method is to catch ferrets with box traps nearby, and then use them to drive out rabbits from their rabbit holes into your snares. Both of them are located near the fairy ring, so it’s quite a linear process. Simply teleport to the bank when your inventory is full and use the code to teleport right back to the Piscatoris Hunter area.
While it’s a great method starting at level 27, you are limited to only two snares. If you choose to do it at a higher level, you are alotted even more snares at certain level milestones (40, 60, and 80). You can expect to make anywhere between 200,000 to 300,000 gold per hour, depending on your level and market prices.
Deadfall Trap Prickly Kebbits (37 - 49)
The deadfall trap is probably the most AFK and easiest means of training Hunter, and prickly kebbits are half-way decent profit considering the amount of effort put in. You will need to bring an axe to chop logs, and optionally a Chisel to create kebbit bolts to save inventory space (with 32 fletching). These bolts are used for the Hunter Crossbow and you will get around 600 gold worth of bolts per spike, and can add up to a little over 100,000 gold per hour.
Once you have a log, simply use it on one of the deadfall traps around the Piscatoris Hunter area, which is large, easy to notice rock. Once you set up the trap, you will wait for nearby prickly kebbits to approach your trap. There is a random chance that they will escape the trap, consuming your log, or getting killed by it. Once it’s trapped, just click on it to receive your loot. Each kills give a large 204 experience drop.
Since deadfall traps function quite slowly, which has the benefit of being able to multi-task with another skill in between. You can cast high-level alchemy, catch other nearby hunter creatures, or train fletching in the meantime. For whatever reason, this trap gives slightly more experience than most other high-level deadfall spots, so it can be viable for even high-level training.
Razor-Backed Kebbits(49 - 53)
These kebbits are found just outside the Piscatoris Hunter area and are hunted with the same tracking method. You start from its burrow and track it until you can attack it where it's hiding. The experience drop is 348.5, which is not too bad for the amount of effort required.
The main attraction of this particular kebbits is the Long kebbit spike that it always drops. It’s used to create Long Kebbit Bolts, which is hot for player-killing with the hunters’ crossbow.
You can expect around 200,000 to 300,000 gold per hour at the current market rate of around 3,000 gold per kebbit hunted. Banking isn’t necessary if you craft each spike into stackable bolts and drop the rest of the loot.
Grey Chinchompa (53 - 63)
Chinchompas are always in demand, and while the grey ones have a lower price tag, it is still a significant moneymaker for lower-level hunters. They are used by setting box traps in the Piscatoris Hunter area, in which there is a spot right by the fairy ring.
While it’s optional, you can get a bearing for where chinchompas spawn by shooting them with a bow and seeing where they reappear. This should help you determine where to place your traps, which should be around the spawn points instead directly on top.
You will clearly be able to see when one has entered the trap, and the box will be closed and shaking. There is a chance of failure in which a chinchompa will back off and render your trap useless You will have to reset the trap in that case, and it will be a frequent part of your grind. It is a straightforward process that doesn’t require banking, and you can expect over 40,000 experience per hour plus 200,000 gold per hour.
Puro Puro High-Level Implings (60+)
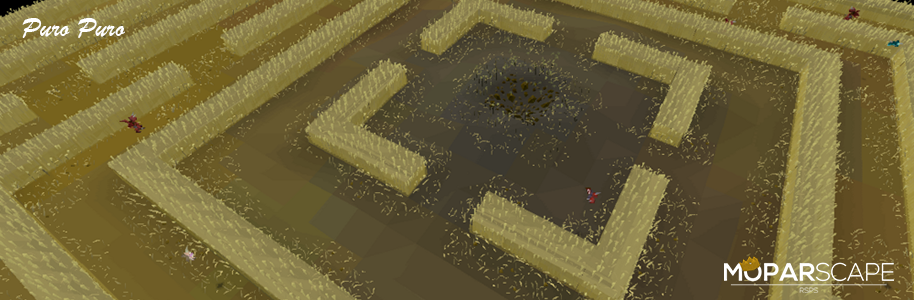
Since it is more of a minigame than a viable training method for experience, Puro Puro is an entirely optional part of your leveling journey. You will want to have Lost City completed for the ease of banking and accessing the area, but it can be done by hopping worlds by a wheat field until the portal spawns.
While there are a variety of implings that have low-level hunter requirements, the higher-level ones are worth catching for their rare rewards. This may include Nature, Magpie, Ninja, Dragon or Lucky implings, depending on what randomly spawns in the maze.
You will have to navigate around the maze to chase down implings, that they can go quite fast. When you see an impling, you should cast Entangle on them so you can catch up with them. Once you catch one with your net, it is best to leave them in the Impling Jar to save inventory space and open them up in the bank.
Implings can also be a decent source of clue scrolls, further adding to its profit potential. You may choose to hoard them in your bank, slowly open them until you get a clue, complete it, and then continue opening them until you hit another one.
Due to luck playing a major role in this grind, it’s hard to predict your experience per hour. Some have reported number like 500,000 gold per hour, but others may claim that well over 1 million gold is possible.
Red Chinchompas (63-73/99)
Red Chinchompas are hunted with the exact same method as the grey ones, just with a higher failure rate and a different location. This one is usually the go-to for ranged training over the other two kinds of chinchompas, and the price is significantly higher than the grey ones. The expected experience per hour is over 100,000 and above as you level up. It’s also nearly twice as profitable as grey chinchompas due to the high market demand.
The carnivorous chinchompa is located within the hunter area of Feldip Hills and the new hunter area near Prifddinas. Use the same technique mentioned with regular chinchompas above, and you should catch between 200 to 300 per hour, depending on how many traps you can lay down.
A tick method is available for this spot and basically allows you to instantly open the trap by overriding its animations. This involves mixing up the animation of creating Guam Tar at the same time as laying a trap. It takes some practice to get used to, but it’s not that hard once you understand how to time it.
While there are multiple spots, the best place to unlock them is within the Diary clocked cave in Feldip Hills. This will probably improve your profit and experience per hour due to bots and gold farmers crowding most other areas.
Fast Training Methods
Polar Kebbits (1 - 7)
As previously mentioned, it would be best to do the Varrock Museum minigame quiz in order to skip through the slow grind of the initial levels. Having said that, Polar Kebbits is still a viable option to start from Level 1.
These kebbits are found on a large Relleka Hunter area that is northeast of the rock crabs. This involves the familiar tracking method of searching burrows and nearby objects to further reveal the trail. Since each kebbit is worth 30 experience, it will be a relatively short grind.
Netting Ruby Harvests (7 – 15)
While catching butterflies is normally far from efficient, it is actually a decent choice in this level bracket. Ruby Harvests are found in the southern area of the Piscatoris Hunter area and are randomly flying around everywhere. If you are using Runelite, you can highlight them to make tracking them a lot easier.
If you manage to find the spawn location, you can camp them in the same spot repetitively. This would be the preferred means instead of running around everywhere and wasting run energy.
To avoid the need to bank, release them upon catching them since they’re not worth much anyway. Doing them efficiently can get over 10,000 experience per hour, which is quite good considering the level requirement.
Swamp Lizards (29 - 47)
Swamp Lizards, along with other net trap creatures, are very click intensive yet fast means of power-leveling hunter. You will need to travel to the hunter area marked on the map in Mort Myre swamp and bring along several ropes and small fishing nets. The idea is to set up makeshift nets that have the chance of snaring passing by swamp lizards. No banking is involved since these items are useless, so you will drop them in between catches.
The higher your level progresses, you will be able to set additional traps on top of the initial two at a time. This severely affects the experience per hour, with level 29 only being able to achieve around 20,000 experience per hour. Once you get to level 40, you can expect well over 40,000 experience per hour, beating most other methods even higher tiers.
Orange Salmanders (47 - 59)
Orange Salamanders is practically the same method as swamp lizards, but with the additional challenge of the desert heat. As you travel to the middle of the Uzer Hunter area, you need to have desert robes and plenty of waterskins to extend your grinding trips.
You set up each trap on a young tree, and multiple of them are clumped together for convenience. The idea is to constantly be checking and setting up traps, so it will be somewhat click intensive to keep on top of everything.
The expected experience rates are around 40,000 to 50,000 per hour, depending on your level and concentration you have on the game. If you a knife or humidify spell to refill waterskins, this will help maintain your experience rates by preventing the need for bank trips.
Red Salamanders (59 – 67/72)
The Red Salamander is caught in a similar manner as Orange Salamanders, but with considerably higher experience per hour. The area is near the entrance to the Ourania Altar and may conveniently be reached via the Ourania Teleport spell. There is a bank nearby, but you will need to bring some runes to purchase access to it every time you want to open it up.
There is a noticeable difference in experience rates between level 59 and 60, which is why you may consider taking along Hunter Potions in the meantime. This is due to being able to lay down 4 traps at a time, giving you experience rates up to 100,000 per hour.
Black Salamanders (67 – 73/99)
Black salamanders are the highest tier in net trapping and it functions exactly the same as all the others. Each catch gives 319 experience, making it a slight upgrade over the previous grind. You will have to venture just northwest of the Hill Giants northeast of the chaos altar. Don’t take items you are not willing to lose as there are sometimes PK teams around.
Some players, especially Ultimate or Hardcore Ironmen, choose to skip this spot due to its location. The experience per hour is only slightly higher than Red Salamanders, so it may be worth it to stay at red salamanders for awhile.
Black Chinchompas (73 – 99)
There is no comparison in both experience and profitability when it comes to black chinchompas, although it does come with significant risk. These chinchompas are located in level 32 wilderness, just below the moss giants. You can easily reach this spot by the canoe system, assuming you have 57+ woodcutting. Otherwise, it may also be reached via a Burning Amulet and running over.
There is no real trick to catching these chinchompas, and you can get in excess of 250,000 experience per hour and 1.5 million gold per hour. The main challenge is avoiding and surviving player killers that frequent this area.
One strategy is to wear menacing gear that has high magic defense and a certain amount of offensive bonuses. Basically, if it looks like you can fight back, people will leave you alone. If you are still attacked, be sure to turn on Protect From Magic to avoid being hit with snares or teleblocks and get down to level 29 wilderness to teleport out.
If you are a level 3 skiller or pure, you will just have to keep an eye out for low-level killers since it would be hard to escape. In fact, some people create builds purely for the purpose of killing low-level black chinchompa grinders.
It is also common to train here while being under the protection of a clan or PK team. This could be your group of friends or arranging some sort of transaction with a team to anti-PK for you. Just be sure that you or your team doesn’t get lured into a multi-combat zone where a larger clan may be waiting.
